Gallery Wall Layout Ideas — 5 Proven Arrangements That Always Look Amazing
Creating a gallery wall should be exciting, not stressful. But if you’ve ever stood in front of a blank wall with a pile of frames, unsure where to start, you’re not alone. The difference between a gallery wall that looks professionally curated and one that feels chaotic often comes down to one thing: layout.
I’ve analyzed hundreds of gallery walls—from design magazines to real homes—and identified the core principles that separate successful arrangements from failed attempts. The truth is, you don’t need an art degree or perfect spacing to create a stunning gallery wall. You need a proven layout template and an understanding of a few key rules.
In this comprehensive guide, I’ll walk you through five timeless gallery wall layouts that work in any space, the exact measurements and spacing rules designers use, and a step-by-step planning process that eliminates guesswork. Whether you’re working with a large living room wall or a narrow hallway, you’ll learn how to create a gallery wall that looks intentional, balanced, and uniquely yours.
WHY LAYOUT MATTERS MORE THAN THE ART ITSELF
Here’s a secret most people don’t realize: the layout of your gallery wall matters more than the individual pieces you hang. I’ve seen expensive art look mediocre because of poor arrangement, and I’ve seen affordable prints look museum-quality because of thoughtful layout.
Layout determines how your eye moves across the wall, whether the arrangement feels balanced or chaotic, and how the gallery wall relates to the furniture and architecture around it. A well-planned layout creates visual harmony—your brain registers the arrangement as “right” even if you can’t articulate why.
The problem is that most people approach gallery walls backwards. They buy frames and art first, then try to figure out how to arrange them. This almost always leads to frustration because you’re trying to solve a spatial puzzle without knowing the rules.
The smarter approach? Choose your layout template first, then select frames and art to fit that template. This gives you a clear roadmap and eliminates the anxiety of staring at a blank wall wondering where to start.
THE 5 GOLDEN RULES OF GALLERY WALL SPACING
Before we dive into specific layouts, you need to understand the universal spacing rules that make any gallery wall look professional:
Rule 1: The 57-Inch Rule
The center of your gallery wall (or a single piece) should be at 57 inches from the floor. This is the standard “eye level” used in museums and galleries. It ensures your art is positioned where people naturally look, not too high or too low.
Rule 2: The 2-3 Inch Gap
Space between frames should be consistent—typically 2-3 inches. This creates visual cohesion. Spacing that’s too tight (less than 2 inches) makes the wall feel cramped. Spacing that’s too wide (more than 4 inches) makes pieces feel disconnected.
Rule 3: The Furniture Buffer
Leave 6-8 inches between the bottom of your gallery wall and the top of furniture (sofa, console table, bed). This creates breathing room and prevents the arrangement from feeling like it’s sitting directly on the furniture.
Rule 4: The Anchor Principle
In asymmetric layouts, use the largest or most visually striking piece as your anchor. Place it first (usually slightly off-center), then build around it. This creates a focal point and makes the arrangement feel intentional.
Rule 5: The Perimeter Rule
Imagine a rectangular boundary around your entire gallery wall. The outer edges should form clean lines—no random pieces floating outside the invisible frame. This creates a sense of order even in organic, asymmetric arrangements.
5 PROVEN GALLERY WALL LAYOUTS
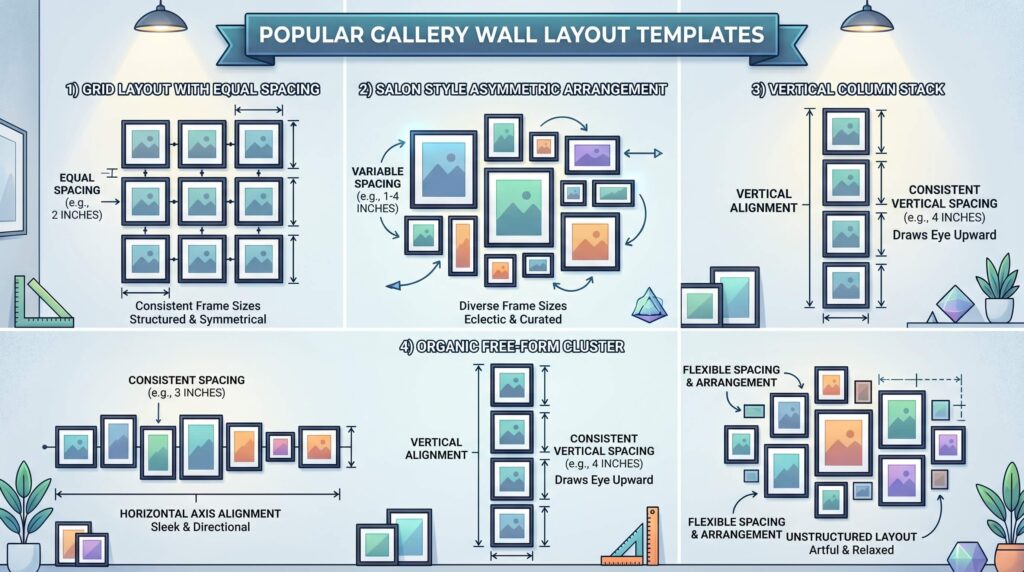
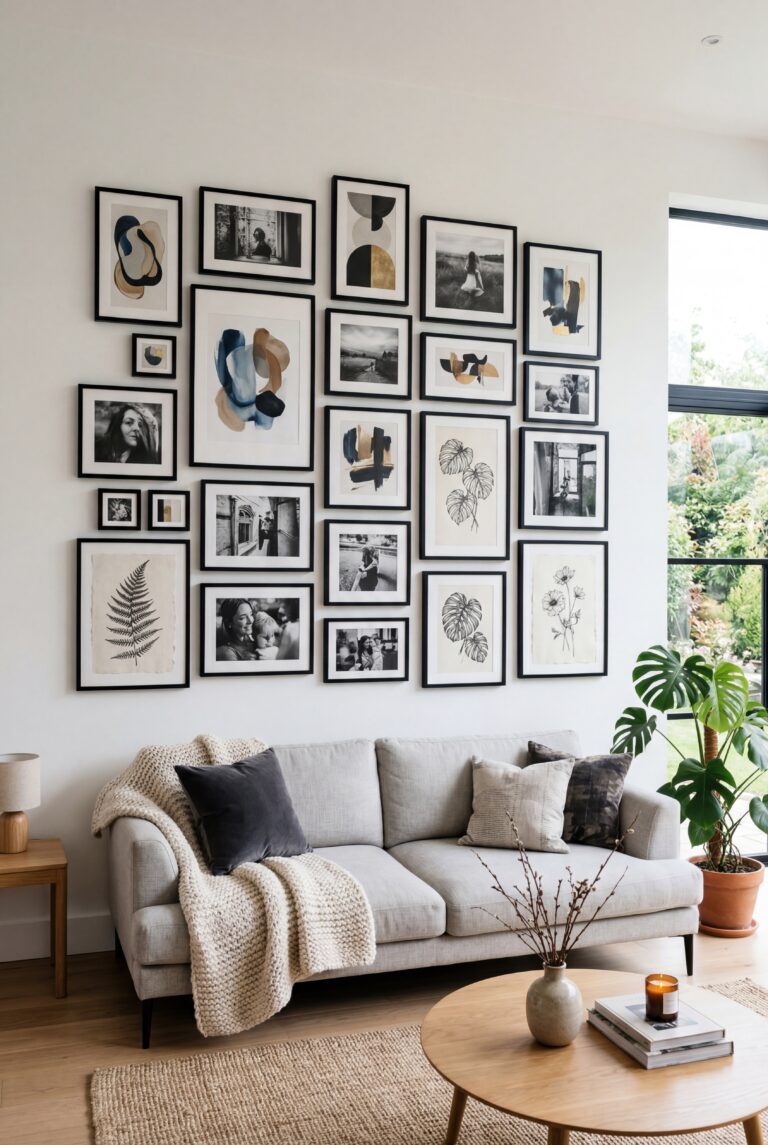
1. The Grid Layout: Classic and Foolproof
What it is: Frames arranged in evenly spaced rows and columns, creating a clean, geometric pattern.
Best for: Symmetry lovers, modern or minimalist spaces, collections of similar-sized frames, anyone who wants a no-fail option.
How to execute:
- Use identical or similar-sized frames (all 8×10, or mix 8×10 and 11×14)
- Maintain equal spacing between all frames (2-3 inches)
- Start with the center frame and work outward
- Most common configurations: 3×3 (9 frames), 2×4 (8 frames), 3×4 (12 frames)
Pro tip: Grid layouts work best with a cohesive theme—all black and white photography, all botanical prints, or all abstract art. Mixing too many styles can feel chaotic even with perfect spacing.
Common mistake to avoid: Hanging the grid too high. Remember the 57-inch rule—the center of the entire grid should be at eye level, not the center of each individual frame.
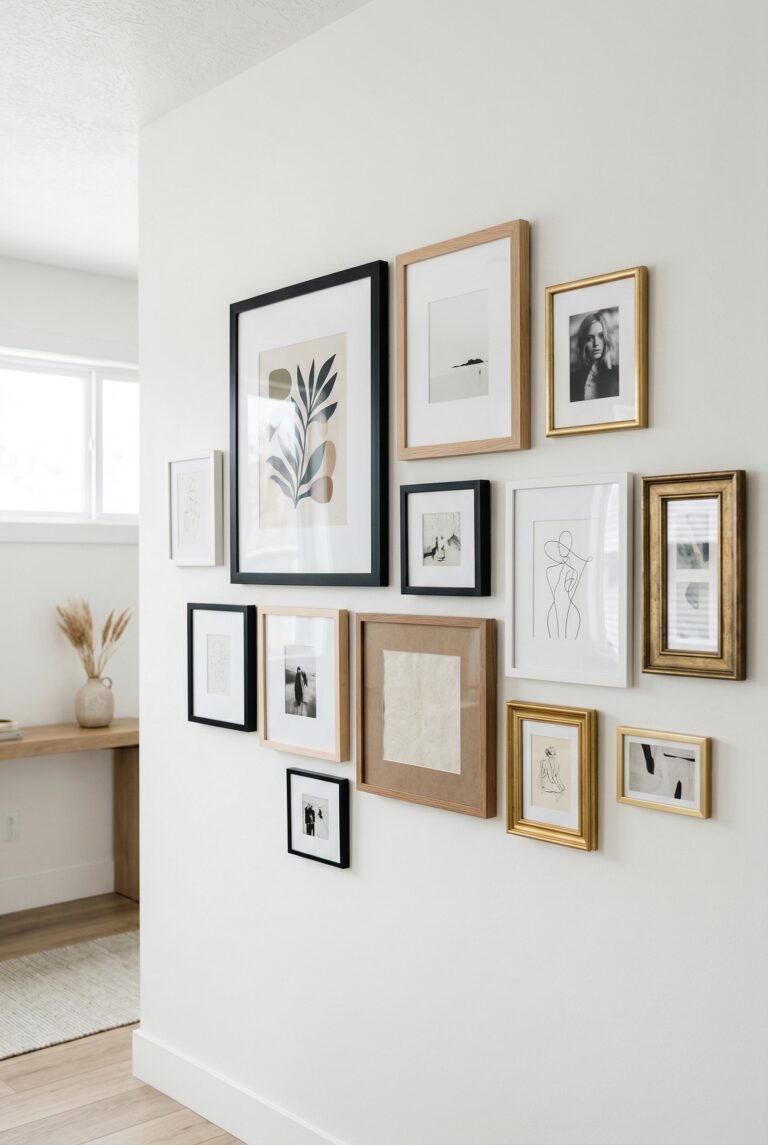
2. The Salon Style: Eclectic and Collected
What it is: An organic, asymmetric arrangement with mixed frame sizes, orientations, and styles, covering most of the wall space.
Best for: Maximalists, eclectic or bohemian spaces, people with diverse art collections, large walls that need visual impact.
How to execute:
- Start with your largest piece slightly off-center
- Build outward, mixing horizontal and vertical orientations
- Vary frame sizes but maintain consistent spacing (2-3 inches)
- Fill the space densely—salon walls should feel abundant, not sparse
- Mix frame colors (black, white, gold, natural wood) for visual interest
Pro tip: Lay out your entire arrangement on the floor first. Take a photo from above to see the overall composition before committing to the wall.
Common mistake to avoid: Random placement without an anchor. Even organic arrangements need structure. Your largest or most striking piece should be the visual anchor that grounds the entire wall.
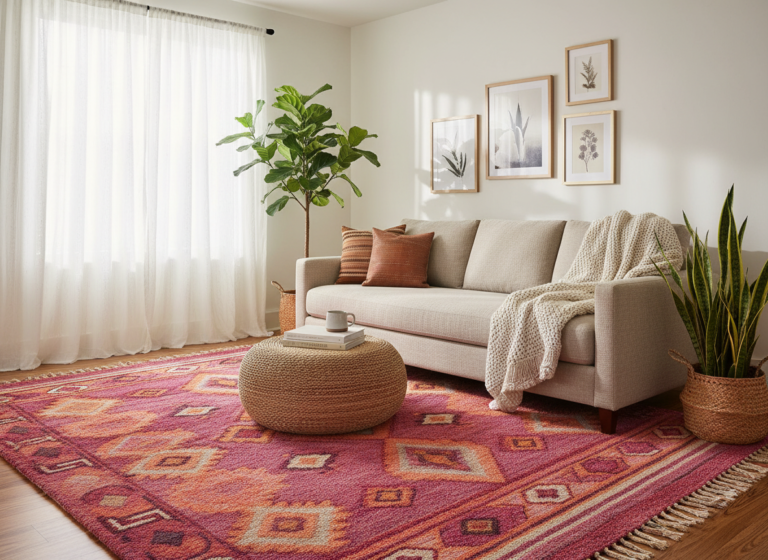
3. The Linear Layout: Simple and Modern
What it is: Frames arranged in a single horizontal row, creating a clean, streamlined look.
Best for: Narrow walls, hallways, above console tables or beds, minimalist spaces, small art collections.
How to execute:
- Use 3-5 frames of the same size or complementary sizes
- Maintain equal spacing between frames (2-3 inches)
- Align the bottom edges or center line for cohesion
- Keep frames at the same height (center at 57 inches)
Pro tip: Linear layouts work beautifully with a theme—a series of black and white photographs, a progression of botanical prints, or a color gradient.
Common mistake to avoid: Using too many frames. More than 5-6 frames in a row starts to feel cluttered rather than streamlined.
4. The Vertical Stack: Space-Saving and Elegant
What it is: Frames stacked vertically in a single column, ideal for narrow walls or small spaces.
Best for: Narrow walls beside doorways, small entryways, bathrooms, stairwells, maximizing vertical space.
How to execute:
- Use 3-4 frames of the same width
- Stack vertically with consistent spacing (2-3 inches)
- Center the stack on the wall
- The center of the entire stack should be at 57 inches
Pro tip: Vertical stacks work best with a visual progression—largest at the bottom, smallest at the top, or a color gradient from dark to light.
Common mistake to avoid: Hanging too many frames. More than 4-5 frames in a vertical stack can feel overwhelming in a small space.
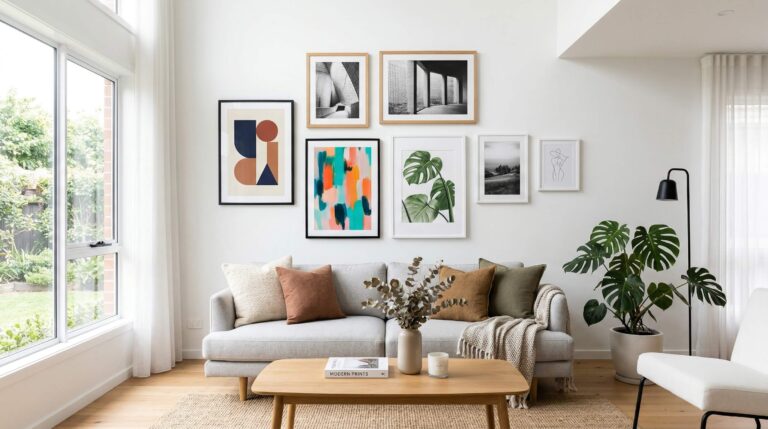
5. The Organic Cluster: Balanced Asymmetry
What it is: A loosely grouped arrangement with mixed sizes that feels casual and collected, but still balanced.
Best for: Small to medium walls, people who want a curated look without rigid structure, mixing art with decorative objects (mirrors, shelves).
How to execute:
- Choose 5-9 pieces of varying sizes
- Place the largest piece first as your anchor (slightly off-center)
- Build around it, balancing visual weight on both sides
- Maintain consistent spacing (2-3 inches)
- Step back frequently to assess balance
Pro tip: Use the “imaginary rectangle” rule—even though the arrangement is organic, the outer edges should form a cohesive boundary.
Common mistake to avoid: Confusing “organic” with “random.” Organic clusters still need visual balance—if one side feels heavier, adjust placement or add a piece to the lighter side.
THE FOOLPROOF PLANNING PROCESS
Here’s the exact process I use to plan every gallery wall, eliminating guesswork and mistakes:
Step 1: Measure Your Wall Space (10 minutes)
- Measure the width and height of your available wall space
- Account for furniture below (leave 6-8 inches buffer)
- Account for architectural elements (windows, outlets, light switches)
- Determine your usable space
Step 2: Choose Your Layout Template (5 minutes)
- Based on your space and style, select one of the five layouts above
- Sketch it on paper with approximate dimensions
- Decide how many frames you need and what sizes
Step 3: Create Paper Templates (15 minutes)
- Cut paper or newspaper to the exact size of each frame
- Label each template with the frame size
- This lets you test arrangements without putting holes in the wall
Step 4: Arrange on the Floor (20 minutes)
- Lay out your paper templates on the floor in your chosen layout
- Adjust spacing and placement until it looks right
- Take a photo from above for reference
Step 5: Transfer to Wall with Tape (15 minutes)
- Use painter’s tape to mark the center line at 57 inches
- Tape your paper templates to the wall in your tested arrangement
- Step back and assess—does it look balanced?
- Make adjustments before hammering any nails
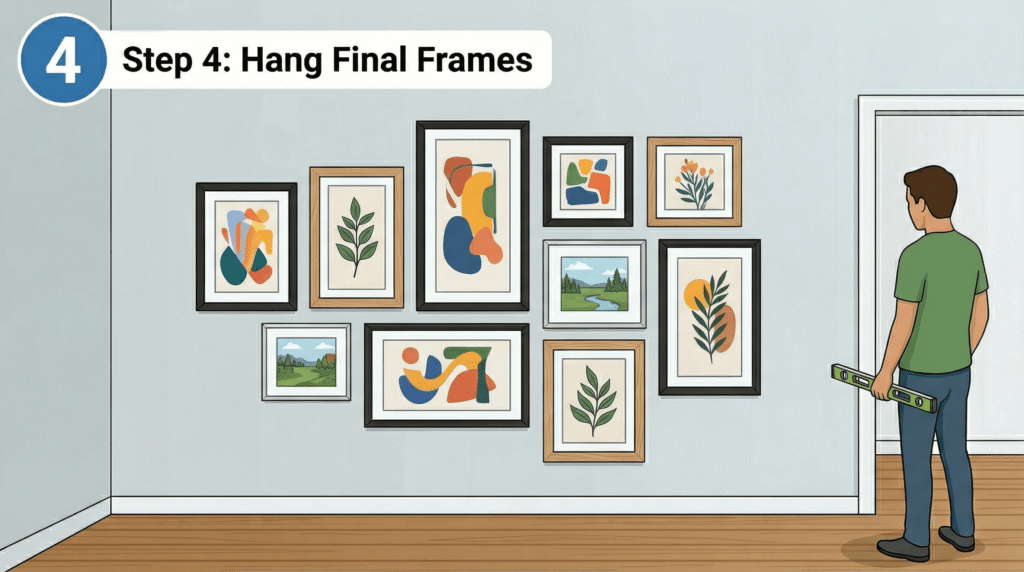
Step 6: Mark and Hang (30 minutes)
- Mark the nail placement on each paper template
- Remove templates one at a time and hammer nails
- Hang frames, using a level to ensure they’re straight
- Step back and admire your perfectly planned gallery wall
Total time investment: About 90 minutes of planning saves hours of frustration and prevents costly mistakes.
COMMON GALLERY WALL MISTAKES (AND HOW TO FIX THEM)
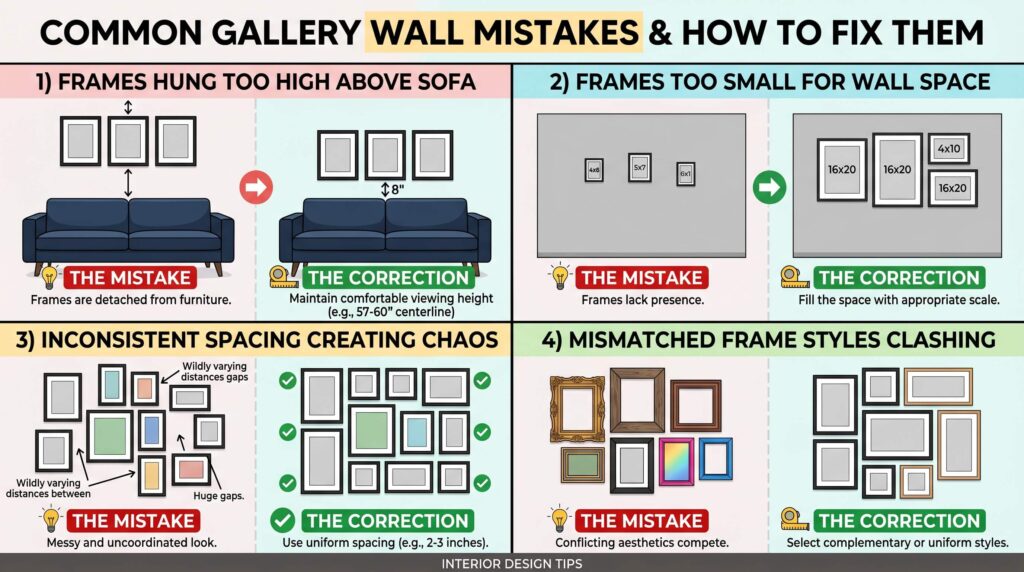
Even with a good layout, these mistakes can sabotage your gallery wall:
Mistake 1: Hanging Too High
The most common error. If you have to tilt your head up to see the art, it’s too high.
Fix: Use the 57-inch rule. Measure from the floor to the center of your gallery wall (or single piece). This is eye level for most people.
Mistake 2: Frames Too Small for the Space
A tiny gallery wall on a huge blank wall looks lost and insignificant.
Fix: Your gallery wall should fill 2/3 to 3/4 of the available wall width. If your wall is 96 inches wide, your gallery wall should be 64-72 inches wide.
Mistake 3: Inconsistent Spacing
Random gaps between frames create visual chaos.
Fix: Use a consistent 2-3 inch gap between all frames. Use a ruler or spacer to ensure accuracy.
Mistake 4: No Visual Anchor
In asymmetric layouts, without an anchor piece, the arrangement feels aimless.
Fix: Place your largest or most striking piece first, slightly off-center. Build the rest of the arrangement around it.
Mistake 5: Ignoring the Furniture
A gallery wall that doesn’t relate to the furniture below it feels disconnected.
Fix: The width of your gallery wall should be roughly 2/3 the width of the furniture below it. Leave 6-8 inches of space between the furniture and the bottom of the gallery wall.
GALLERY WALL LAYOUTS FOR SPECIFIC SPACES
Above a Sofa
- Best layouts: Grid (3×3 or 2×4), Salon Style, Organic Cluster
- Width guideline: 2/3 the width of your sofa
- Height guideline: 6-8 inches above the sofa back
Above a Console Table
- Best layouts: Linear (horizontal row), Vertical Stack, Small Grid (2×2)
- Width guideline: Slightly narrower than the table width
- Height guideline: 6-8 inches above the table surface
In a Hallway
- Best layouts: Linear (horizontal row), Vertical Stack, Small Organic Cluster
- Width guideline: Leave 12-18 inches of wall space on each side
- Height guideline: Center at 57 inches
In a Stairwell
- Best layouts: Diagonal progression following the stairs, Vertical Stack
- Width guideline: Consistent distance from the stair railing
- Height guideline: Maintain consistent spacing as the wall rises
Above a Bed
- Best layouts: Grid (2×3 or 3×2), Linear (horizontal row), Symmetrical Pair
- Width guideline: 2/3 the width of the headboard
- Height guideline: 6-8 inches above the headboard
CHOOSING FRAMES AND ART FOR YOUR LAYOUT
Once you’ve chosen your layout, selecting frames and art becomes much easier:
For Grid Layouts:
- Use identical frames for maximum cohesion
- Choose a unifying theme (all black and white, all botanical, all abstract)
- Matting creates breathing room and elevates inexpensive prints
For Salon Style:
- Mix frame colors (black, white, gold, natural wood)
- Vary art styles for visual interest
- Include different mediums (prints, photographs, paintings, even small mirrors)
For Linear Layouts:
- Use matching frames for a streamlined look
- Choose art with a visual connection (color palette, theme, style)
- Consider a series or progression
For Vertical Stacks:
- Use frames of the same width but varying heights
- Create visual flow from top to bottom
- Consider a gradient (dark to light, large to small)
For Organic Clusters:
- Mix 2-3 frame colors maximum
- Balance visual weight (a large dark frame needs a counterbalance)
- Include varying sizes (mix large, medium, and small)
YOUR GALLERY WALL ACTION PLAN
Ready to create your own gallery wall? Follow this roadmap:
Week 1: Planning
- Measure your wall space
- Choose your layout template
- Decide how many frames you need and what sizes
- Order frames and art (or shop your home for existing pieces)
Week 2: Preparation
- Create paper templates
- Test your arrangement on the floor
- Photograph your layout for reference
- Gather tools (hammer, nails, level, tape measure, painter’s tape)
Week 3: Execution
- Tape paper templates to the wall
- Make final adjustments
- Mark nail placements
- Hang frames one by one
- Use a level to ensure straight placement
Week 4: Refinement
- Step back and assess the overall look
- Make minor adjustments if needed
- Add finishing touches (adjust lighting, style nearby furniture)
- Enjoy your perfectly curated gallery wall
The key is taking your time with planning. The actual hanging takes less than an hour when you’ve done the prep work properly.